Friday, December 21, 2012

Cookie love for a military family

There is only one box of cookies that I am mailing out this Christmas.


They are going to a special family that I have had on my heart and in my prayers since they lost their son on September 1 of this year. 


This hit me close to home.
 I can only imagine the devastation felt, and how difficult the holidays must seem to all of the parents, spouses, children, and friends who are trying to make their way through loss at this time of year.  


You can better believe that I am counting my blessings.

There are a lot of terrible things that happen here at home and around the world, and I sure wish this enchanted oven had a really big magic wand to make it all better.  In a small gesture of support, I made some cookies that I infused with lots of love and prayers.


I am trying to take Mother Teresa's advice:
"Not all of us can do great things.  But we can do small things with great love".  


Would you like to join me in a small act of love?


Imperial Sugar has partnered with Operation Homefront, a nonprofit organization that provides emergency assistance for our troops, for the families they leave behind, and for wounded warriors when they return home.  From now until 12/31/12 Imperial Sugar Company will donate $1 to Operation Homefront for every Imperial Sugar Facebook fan, twitter follower, and Pintrest follower.  
Click here to see how easy it is, and pass the information along however you can - tweet, post, blog, or shout from the rooftop!

I think I will be making Mother Teresa's words my mantra for the 2013, and I wish you all a beautiful holiday.

Lisa


Monday, December 17, 2012

A very happy army homecoming

It has been a long year since we said goodbye to our soldier.  
Saturday night at Dulles International Airport was the scene of a 
VERY, VERY HAPPY and emotional homecoming.


I got my Christmas present early this year!


All my love to the brave men and women who are deployed over Christmas, and to their families who are missing them.  

And all my love and PRAYERS to the parents whose children have been lost to war or the senseless violence of last Friday.   

I think we are all holding our kids extra tight this week.

Wednesday, December 5, 2012

Snow globe cookie party favors

Here is the thing about my ideas, they are either epic failures or great victories.  I don't have a lot of middle ground in my kitchen.  


This one was a victory my friends.
And here is the good news; 
it is inexpensive, fun to make, and you can even do it without any baking!

Let me start at the beginning.  
I baked large round gingerbread cookies and iced them in white.  Next, I baked myself some cute little wintry cookies and decorated them.  Using traditional royal icing (2 cups powdered sugar, 3 tbsp. warm water, and 1 1/2 tbsp. meringue powder beaten for 6 minutes with a whisk attachment on your stand mixer) as the "glue", I set my little cast of characters on top of the large round cookies.  I also used a star tip on the royal icing to make a little "snow".  


Cutey patooties aren't they?
To give the snow globe effect, I simply placed a 99 cent clear  votive holder over the top.  The only thing that is potentially tricky, is arranging your cookie characters so they fit inside the opening of the votive holder.  


Can't you just picture these on a holiday tablescape?


Are you ready for the non baked version?
Purchase the large cookies, the clear votives, and then


cruise through the grocery store and find seasonal cookies and crackers!  I gave mine a bit of icing embellishment, but you wouldn't have to.  I am in loooooooove with the little gold fish penguins!!!


A little black and white icing is all you need because the feet and bills are already orange!


I didn't do it here, but if I were making these for a party I would make a royal icing embellishment around the base of the votive holder so it couldn't slip around - especially if they were for children.  


A sweet nibble, a candle holder that can be used after the cookies are gone, inexpensive, and CAN be made with goodies from the grocery store.  


I love a good victory.
Sharing with
Tutorial, tips, and tidbits at StoneGable
Cupcakes Garden

Sunday, December 2, 2012

Minnie Mouse cookies

When an old friend asked me if I would make Minnie Mouse cookies for her granddaughter's 2nd birthday, I was tickled 
PINK!


I think I may have mentioned before that I do not own one of those kopy kake thingamajigs, so when I have to do multiples of images that are so recognizable, I have to be very careful to not make it look like Minnie and her 17 sisters who slightly resemble her.  You know what I am saying?
So here are a few Minnie Mouses - or is it Minnie Mice?
Sheesh.


Happy birthday Emma!

Sharing with
Sugar and Slice link party

Thursday, November 29, 2012

Cupcakes with kids

While I was back in Iowa for Thanksgiving, and I made cupcakes with my two great nieces.  Nine year old Starr and six year old Kylie LOVE to help out in the kitchen.  We made boxed cake mix and divided it into three bowls, each being a different color. 


Then I let the girls spoon the colors into the cupcake papers.  It was funny because Starr went to town with eleven of them, and Kylie used the tiniest amounts of batter and worked on one cupcake the entire time.   Oh my, how she loved making that one cupcake!


After the cupcakes cooled, I made some buttercream and then "painted" stripes of gel food coloring  in stripes along the inside of the piping bags.  When the bags are filled with the buttercream and piped on the cupcakes,
SOME MAGIC HAPPENS!


Happy girls and swirly colors!


Starr's favorite cupcake is on the left and Kylie's beloved cupcake is on the right.  They were soooooo proud of them!


And what is sweeter than cupcakes?


Big smiles and wonderful memories.


Sunday, November 18, 2012

Candy filled pinata cupcakes

My darling Isabelle and a friend hosted a surprise birthday "fiesta" for another friend.  Of course, I thought about cookies but couldn't find any cutter at local stores and I didn't have time to order any.  
I SWEAR that I see southwestern cookie cutters all of the time, but when I actually needed some it was 
NO BUENO.
Not being in the mood to hand cut a bunch of cactus, serapes, and pinatas, I decided to go the cupcake route.  
Pinata cupcakes!
This was super easy to do, and I think they turned out kind of cute. First I baked a batch of funfetti cupcakes, and after they had cooled, I cut the centers out with a knife.


I bought some brightly colored  candies and sprinkles.


Then I stuffed the hollow of the cupcakes with the goodies.


Took the top of the cut out pieces, and plugged up the hole.


Now all that had to be done was the frosting.  I colored my frosting three shades of festive, and then piped it to resemble the crepe paper pieces that make a pinata.


You can even top each cupcake with a pretzel rod which can be the  stick to whack the pinata with.


And just like a real pinata, when you break it open, you get a shower of candy!


FUN!!!


Sharing with

Tuesday, November 13, 2012

Turkey cookie bouquet for Thanksgiving

Gobbity gob gobble everyone!  Thanksgiving is almost upon us, and I have been plotting this project for a couple of weeks now.  


I'm thinking centerpiece for the children's table, hostess gift, or a cookie to nibble on for those non pie eaters.  

*I really cannot relate to non pie eaters.* 

This is not a difficult project, but it does take a little planning and perhaps a trip to the Dollar Tree.  
Along with cookie dough and icing, you will need cookie/candy sticks, floral foam, clean stones, shredded paper, fall paper leaves, a basket, and some candy pumpkins.


All my goodies from The Dollar Tree


Once you have your supplies, you can begin the cookie making by creating templates for the turkey body and feathers.  I cannot make ANYTHING symmetrical, so I fold a piece of card stock in half and draw half of the shape I want.  Once I cut it out and unfold it, I have perfect little feathers and body.


For this particular basket I wanted three small feathers, four medium feathers, and five large, but you can adjust for the size of container you are using.  


Use your templates to cut out your cookie dough.  I really dislike hand cutting, but sometimes you just have to.  


Place your cut outs on a baking sheet, gently press a stick on top, and I always add extra dough over the stick for added stability.  I am very paranoid about cookies falling off of sticks.  
Quite tragic when it happens.


 Once the cookies have baked and cooled, it is time to start decorating them.  For cookies on sticks, I always decorate the side that was on the cookie sheet because of the lumpy stick situation on the top.  


I also put a small dowel under the top section to ensure that the cookies are sitting flat.  You don't want your flood icing to flood.  
I used red, yellow, and orange with black details, but you could really do anything here.  


Time to start assembling!  I put some hot glue in the bottom of my basket to keep the floral foam secure and I added stones to weigh it all down.  Cookies of that size are pretty darn heavy, and you certainly don't want the whole thing to topple over.  
Just stick the cookies into the floral foam, add some paper grass, leaves, and candy pumpkins.  
I couldn't resist making the turkey look like he is looking over his shoulder - after all, it is Thanksgiving.  Yes, I would be very paranoid if I was a turkey in November.


Then I made a cute little card using graphics from The Graphics Fairy, and glued it onto a stick.


And there you have it kids -  A fun edible Thanksgiving centerpiece that can be enjoyed by young and old!


Sharing with

Monday, November 12, 2012

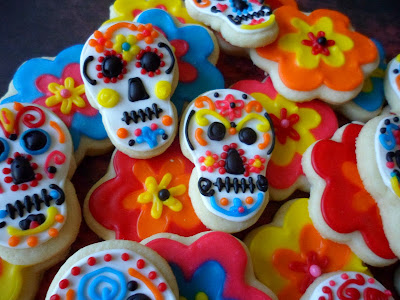
Day of the Dead cookies and how to make your own hybrid cookie cutter


I know, more cookies out of season.  What will I be doing next - Easter?
My darling Isabelle is taking Spanish 1, and her class was having a day of the dead party on Friday with extra credit given for bringing in treats.  Cookies to the rescue!


Decorated skulls were a must for this project, but I had a little problem.  My skull cutter is really tiny AND it has cut outs for the eyes, nose, and mouth, making it quite difficult to do the embellishments.  I took a quick spin through the local stores that carry cookie cutters, and the Halloween skulls were all gone.  
Solution?
Either make my own template OR use cutters I already have, and merge them into a hybrid of sorts.  I rooted through my cutter collection (which is obscenely large), and decided that my gingerbread boy and girl heads would be just dandy.


Cutting out a boy head and a girl head,


and pressing them together on a cookie sheet,


makes a skull shape!
When baked, the shapes melt together perfectly and are quite sturdy.  Isabelle did the cutting and baking,


and I did the decorating.  Making your own "hybrid" cutter shapes is a great way to make do with what you already have on hand.  Take a look at shapes you most likely have in your collection - (hearts, stars, circles, etc.) and think about how you can merge them together.  It certainly beats cutting shapes by hand, which is a very tedious job.  


The Enchanted Oven is back on track this week with Thanksgiving cookies and a really fun new project!   
Gobble, gobble!

  Sharing with
StoneGable